Showing posts with label Blogger Widget. Show all posts

Pure CSS Lavalamp Menu for Blogger

I think that you have already seen animated menus with the LavaLamp effect based on the jQuery plugin. Today I would like to tell and show you how to repeat same behavior, only with CSS3 without any JavaScript. I will use CSS3 transitions in our menu to animate elements.

Pure CSS lava lamp menu for Blogger

Features

 - Simple but Stylish
 - Faster loading
 - Less usage of coding
 - Auto adjust with almost every blogger templates
 - Tested and runs with every latest Browsers
 - And more...............

 So, if you are ready, let's start.

DEMO

Add This Menu To Blogger

To add this Menu to your blogger blog follow below steps:
1. Go to Blogger Dashboard > Layout > Add a HTML/Javascript widget
2. Change the links and titles as your need and paste the below codes, Save and Drag the widget right below the header.

<style type="text/css">
.nav {
margin:auto;
overflow:hidden;
position:relative;
text-align:center;
width:500px
}
.nav a {
-moz-transition:.7s;
-ms-transition:.7s;
-o-transition:.7s;
-webkit-transition:.7s;
color:#393939;
display:block;
float:left;
font:25px Impact;
padding:1em 0 2em;
position:relative;
text-decoration:none;
transition:.7s;
width:25%
}
.nav a:hover {
color:#c6342e
}
.effect {
-moz-transition:.7s ease-in-out;
-ms-transition:.7s ease-in-out;
-o-transition:.7s ease-in-out;
-webkit-transition:.7s ease-in-out;
left:-12.5%;
position:absolute;
transition:.7s ease-in-out
}
.nav a:nth-child(1):hover ~ .effect {
left:12.5%
}
.nav a:nth-child(2):hover ~ .effect {
left:37.5%
}
.nav a:nth-child(3):hover ~ .effect {
left:62.5%
}
.nav a:nth-child(4):hover ~ .effect {
left:87.5%
}
.aslava-dot-nav:after {
background:#c6342e;
bottom:40px;
content:"";
display:block;
height:1px;
position:absolute;
width:100%
}
.aslava-dot-nav a:after {
background:#c6342e;
border-radius:100%;
bottom:38px;
content:"";
height:4px;
left:50%;
margin-left:-2px;
position:absolute;
width:4px
}
.aslava-dot-nav .effect {
background:#c6342e;
border-radius:100%;
bottom:36px;
height:10px;
margin-left:-5px;
width:10px
}
</style>

<div class="aslava-dot-nav nav">
<a href="#">Home</a>
<a href="#">About</a>
<a href="#">Gallery</a>
<a href="#">Contact</a>
<div class="effect"></div>
</div>

Compressed Edition

Here is the compressed edition of this Lavalamp menu for more faster loading perform-

<style type="text/css">
.nav{margin:auto;overflow:hidden;position:relative;text-align:center;width:500px}.nav a{-moz-transition:.7s;-ms-transition:.7s;-o-transition:.7s;-webkit-transition:.7s;color:#393939;display:block;float:left;font:25px Impact;padding:1em 0 2em;position:relative;text-decoration:none;transition:.7s;width:25%}.nav a:hover{color:#c6342e}.effect{-moz-transition:.7s ease-in-out;-ms-transition:.7s ease-in-out;-o-transition:.7s ease-in-out;-webkit-transition:.7s ease-in-out;left:-12.5%;position:absolute;transition:.7s ease-in-out}.nav a:nth-child(1):hover ~ .effect{left:12.5%}.nav a:nth-child(2):hover ~ .effect{left:37.5%}.nav a:nth-child(3):hover ~ .effect{left:62.5%}.nav a:nth-child(4):hover ~ .effect{left:87.5%}.aslava-dot-nav:after{background:#c6342e;bottom:40px;content:"";display:block;height:1px;position:absolute;width:100%}.aslava-dot-nav a:after{background:#c6342e;border-radius:100%;bottom:38px;content:"";height:4px;left:50%;margin-left:-2px;position:absolute;width:4px}.aslava-dot-nav .effect{background:#c6342e;border-radius:100%;bottom:36px;height:10px;margin-left:-5px;width:10px}
</style>
<div class="aslava-dot-nav nav">
<a href="#">Home</a>
<a href="#">About</a>
<a href="#">Gallery</a>
<a href="#">Contact</a>
<div class="effect"></div>
</div>

In this menu you can not add more than four links, but if you are advanced in CSS coding them you can modify this menu for adding as much link as you want.

Hope you enjoyed with our new CSS Lavalamp menu. Don't forget to offer thanks and leave a comment.  Smile :)

Continue Reading »

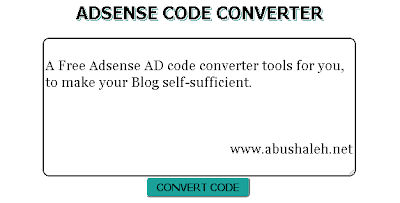
Giveaway: Adsense AD code converter Plugin for Blogger

If you want to add Adsense Ad units or any other ad scripts inside the Blogger Template or anywhere in the Blog, You can't directly Paste it in the template code. You need to first convert the code and make it Blogger Template friendly!

Adsense AD code converter script
This tool automatically converts AD codes into the correct format so you can embed it directly into your xml Blogger template. It is perfect for converting AdSense, Chitika or any other AD codes you may have.

In this post I have this tool free for you and your Blogger/blogspot Blog, to make your Blog self-sufficient. This Plugin is ~2kb created using Javascript, HTML and Embeded CSS.

Install this Plugin in your Blog

First Create a Blank Page in your Blogger Blog Than Go to HTML mood and just Paste the codes below-

<script type="text/javascript">
function convert(){var ele1=document.getElementById("somewhere");var replaced;replaced=ele1.value;replaced=replaced.replace(/</ig,"&lt;");replaced=replaced.replace(/>/ig,"&gt;");replaced=replaced.replace(/"/ig,"&quot;");replaced=replaced.replace(/&#177;/ig,"&plusmn;");replaced=replaced.replace(/&#169;/ig,"&copy;");replaced=replaced.replace(/&#174;/ig,"&reg;");replaced=replaced.replace(/howdy/ig,"ya'll");ele1.value=replaced}
</script>
<center><span style="font: Bold 25px Tahoma; margin: 0px; padding: 0px; text-shadow: 0.04em 0.04em #fff,  0.08em 0.08em #1ba29a;">ADSENSE CODE CONVERTER</span><br/>
<table border="0" cellpadding="0" cellspacing="1" style="width: 450px;"><tbody>
<tr><td><br />
<textarea id="somewhere" style="border: 2px solid #111; border-radius: 10px; height: 200px; width: 450px; outline:0; font: 12px Georgia"></textarea><br /></center><center>
<input onclick="convert();" type="button" value="CONVERT CODE" style="height: 30px; width: 150px; font: Bold 15px Tahoma; background-color: #1ba29a; border-radius: 5px;"/>
<br /></center></td></tr></tbody></table></form></center>

Save the Page and Done! Now you can convert your AD codes by going to the page easily when you want :)

Copyright

This Blogger Plugin is fully yours! I did not reserved any copyrights of this script. If you like this don't forget to thanks us, it really Helps. Smile :)

This Tool is for only converting AD codes. For Bigger Scripts use Online Code Encoder. To view this script or any other scripts DEMO or real time work use Online Code Editor.

Continue Reading »

Stylify and Spice up your Blockquote in Blogger- Quick Tip

Hello guys, Blockquote is a piece of HTML and CSS coding in a post which gives a smooth and different look to a specific text as Author like. The default Blogger Template blockquote is ugly and does not give any spicy and professional look. In this post, I will show you how you can style and give your Blogger Template blockquote a PRO look!

blockquote

How To Customize Blockquote?

 - Go to Blogger > Template > Edit Template > And search for /b:skin
 - Paste the following code just above it:


.post-body blockquote {
-moz-transition:background-color 1s;
-ms-transition:background-color 1s;
-o-transition:background-color 1s;
-webkit-transition:background-color 1s;
background-color:#eee;
border:2px solid #ccc;
border-radius:10px;
box-shadow:0 0 10px #aaa;
color:#222;
font:italic 15px Georgia;
margin:5px;
padding:10px;
transition:background-color 1s
}
.post-body blockquote:hover {
background-color:#222;
color:#ddd;
font:15px Georgia
}
.post-body blockquote:active {
border-radius:20px;
color:#fff
}


 - Save your template! Done :)

I hope you might liked my style, but if you did not then you can customize this blockquote style as your taste. Smile :)

Continue Reading »

CSS dropdown subscribe widget for blogger

Today, we are going to build a simple subscribe widget for blogger with some animation and awesome outfit. This widget is much faster then any other subscription widget in the web. It created using less coding and contain only HTML and CSS. Let’s jump in the tutorial, see how it works and how to install it in your blog.

Dropdown subscribe widget


DEMO


Install This Widget In Blogger

As always i have make installation is simple. Add HTML/Javascript gadget into your blog, and paste the following code and save!

<style  type="text/css">
p {
margin: 0px auto;
line-height: 24px;
}
.as-dsf {
position: relative;
display: inline-block;
}
.as-dsf a {
font-family: Verdana, Arial, sans-serif;
font-size: 13px;
text-decoration: none;
text-align: center;
padding: 5px 0;
        text-shadow: 0 0 1px #56A0F1;
}
.as-dsf > a {
display: inline-block;
width: 250px;
z-index: 1;
font-weight: bold;
color: #666;
border: 1px solid #aaa;
border-radius: 3px;
background: #f5f5f5;
}
.as-dsf > a:hover {
background: #f1f1f1;
}
.as-dsf div {
position: absolute;
width: 250px;
height: 8px;
overflow: hidden;
left: 2px;
top: 28px;
        -webkit-transition: all 350ms linear;
-moz-transition: all 350ms linear;
-o-transition: all 350ms linear;
-ms-transition: all 350ms linear;
transition: all 350ms linear;
}
.as-dsf:hover div {
height: 118px;
}
.as-dsf ul {
position: absolute;
bottom: 5px;
left: 0;
width: 246px;
background: #56A0F1;
margin: 0;
padding: 2px 0 9px;
border-radius: 0 0 3px 3px;
border: 1px solid rgba(0,0,0,0.25);
border-width: 0 1px 1px;
box-shadow: 0 -1px 0 rgba(255,255,255,0.5) inset;
z-index: 9999;
}
.as-dsf ul::before {
content: '.';
text-indent: -9999px;
display: block;
background: #56A0F9;
width: 15px;
height: 15px;
position: absolute;
bottom: -4px;
left: 38px;
border-radius: 15px;
box-shadow:
0 -1px 0 rgba(255,255,255,0.5) inset,
0 1px 0 #666;
z-index: 0;
}
.as-dsf ul::after {
content: '.';
text-indent: -9999px;
display: block;
background: #fff;
width: 5px;
height: 5px;
position: absolute;
bottom: -2px;
left: 42px;
border-radius: 15px;
border: 1px solid #666;
box-shadow: 0 -1px 0 rgba(255,255,255,0.5);
z-index: 0;
}
.as-dsf:hover ul {
bottom: none;
}
.as-dsf ul li {
list-style: none;
margin: 0;
padding: 0;
}
.as-dsf ul li a {
display: block;
color: #ddd;
text-shadow: 0 0 8px #111;
}
.as-dsf ul li a:hover {
        color:#fff
}
</style>

<div class="as-dsf">
<a href="#">Join us!</a>
<div>
<ul>
<li><a href="#">Find us on google+</a></li>
<li><a href="#">Find us on facebook</a></li>
<li><a href="#">Find us on twitter</a></li>
<li><a href="#">Grab our newsletter</a></li>
</ul>
</div>
</div>

Change Red Texts with your social profile user names and as always, you can also modify the CSS as your taste. This widget created by me and you can reshare this widget with a link back to us. And Let me know your Feedback :)

Continue Reading »

Simple feedburner subscribe form for blogger

A great way to keep up to date with a blog that you love to follow is to subscribe to an email subscription of their posts. That way, when a new post is made, it lands right in your email inbox. If you want to offer this to people who visit your blog, Then follow this post.

Today we have a nice looking and simple feedburner email subscribe form using some latest web tech, which would surely increase your email subscriptions ratio. Follow the steps below to get this email subscription form installed.

Simple feedburner subscribe form
*As we have used latest web tech this widget may not look good in older browsers*

DEMO


Install This Widget In Blogger

Installation is simple. Add HTML/Javascript gadget into your blog, and paste the following code and save-

<style type="text/css">
*{margin:0;padding:0}
.subscribe {
  margin: 0 auto;
  padding: 20px;
  width: 300px;
  background: #fcfcfc;
  border-radius: 5px;
  -webkit-box-shadow: 0 1px 2px rgba(0, 0, 0, 0.5);
  box-shadow: 0 1px 2px rgba(0, 0, 0, 0.5);
  font-family: Verdana;
  font-size: 14px;
}
.subscribe-pitch {
  padding-left: 100px;
  background: url(data:image/png;base64,iVBORw0KGgoAAAANSUhEUgAAAFcAAABPCAYAAACeTVmaAAAKbklEQVR42u2ae1BU9xXHb5sR9snKe2F5LCsvRRBDwkPwEWOj5uGMrZkaGzMxWtO0tlZHw2NZsstzAQFfqLQxEkRj2lH/oZMmM+mYNp2s7aQaGxlSWzWtqVEIUQPuLrtweg7RjnJ/d3nt4vUKM59h5Hfu7/c7n/v17uVyOQCYGN5asAIO5sTzfn54/jUcA9FxeF7beHueGLGH5m6AwwvcfyudncMba5nbK0a5X+3JtYlfbuvcGkwnEB+Z0nN542/m9dKYyEC5OSKWa07xw8S20EYn5XqTxhQVtM77A1634E7YcnN7aUxkoNxsEco9sEALB+eehkPzYAhsuc0oF8fERlej2OQezE2C1rx/4+UAWLDlzumlMZGBcrNEJLclLw/pxg8wYCMsl8bERtdusch9M2c5tOTaMbXgAUG5NCYyUG6mCOS25Mx37c8+/fXerAvD8W5Basak3FGgVCq1/v7+TyPLhoPjuAD+B2BOL16rQWx07fK6XN8zKXcieSO7F1rmgNjo3PWIBOTuz+rFD0QQG507MkQgtzmrbbyNTMoVoHP7wzZozgapgX2JQW46ys0CqYF9iUBuA27iQCZIjc6GSbkSl1uPm3jjUZAa2JcY5M6ywf5HQGpgX2KQm4ZyM0BqYF8ikLsNN/F6BkgN7Ovey72yLdUGv34YpAb2JRa5s0FiiERubYoNfpUOUgP7mji53VaDBval5vDk1sywQdMskBrUF+Ov2unkwbty985cDk1pV7tqU8ofZLlXrMlbYF/al+Rj/HJ3zg6FPWlHcEIgOkqStg+t+dI63UZjUgP74sn91JRo+X/N3tRD5GdschvTVkDjzE6cBG6BchMYcpNtNCY1sC+m3LvqyM/u6YIpZqQ1PhSvLccw+jAElDuNKZfGpAZbbryFVUu+yJtnuXtSVsHuGd34HRiw5VYl22hMamBffLlGlCtQj946yR9fbn2iDuN9DBpngCc6ig18uZWJNhqTGtgXU+6wxw56TNF+K7dx+g9hV/J1/A7D0c6Um2CjMamBffHknjEaLCM5lnwiq7h9K8Mf77Qm/BN2J8MwsOVWxNtoTGpgX3y5hSh3BMf21iV2f7Apdi2HX5qpCv9lbS9Hv93fkORE4yBEexFbLo1JC2G5wx33SUHch6mRyjVyuTyaDiLB3/Hz80tdlRmYf6U8/jzsTAIW7QV6vtwyg43GpAb2xZCrtwjV99QmdFU8FVaPUvPQpx/vboFSTK8mHV+nO+KuT3DCzkS4k7MMuZdxEzQmNS4LyGXVfrxVfyJRq3wBxeqG/SUCU5xCKb5UavgH7EiAW6DcGIbcOBuNSQ3siy83H+XeUXPdaugs+l6wFaXOwWBO4d/n1setvfUPVoqfPL428oh72zQnbI9HuVF8uaV6G41JDeyLITfGcnv8zxujf58UoXyeXkRk+YMdhlUcNEyDgbq4d8BqiBFK8Q/SNVsvlcR2nM1nyLXE2mgOqYF98eVujbF0V+ov30prJiutUKPXQr3hGM2Bcg2AoGB9DzTErRdIcQCmeGn+wsClbLkGkBhMuWVLg57Qh6hWCqUVpa7CoF6/PQddFuBu9O/ba2PjBCSrh/7sv+ZYGx0nNagvVsiQh/hSo3QD22Lbhs7BQZ0ehtJfG9PTXxu7gSWYLzfaRsdIDeprJP276/QvoqvrrDk4DwvQpeLEkBTz+Cxf1yZFuReNUe97FEtprY19x9McHGyLBU8M1Mbc7K+N3iy0CN2GvL06rNVpjXFQ/f1Of3WM69314ccjg2WLhHrur4lZP1Ab/c1wc3EoD0ZG9J8c1ZFJAncU059JUW76vDiyg2rvVzrNus/XZGuMU6ZMSec47rtD+7SXhccN1MS8N8L5UG5NNIwUd1WU3WXVbf7Ns9xDrA87uqN460chLY7KKAfVixJ2X67frQ07qpb7LddoNIHMtFp1r7itUT2jmJfkRsFocVfrTjrKBFOcPJhiY0QH1Yqdy6aI86sf1RRiWmfRMxZmWqujToxhbpRbrYOx0F8V6eyv1hk9pbj1ueBmR0Wkg+rFRl9lpLPtpeDf0hNB3O9UVlBclRGb3VWRPWNcA+VaI2E89FdGnHKWhqeyNoeCkyjFF/PD26lWLFw2hp9fOVudj//L0lhpdZSFJA1URZwY5zp0LYmA8eKu1DpdlVrLWTPnJ5DiJa3PBTXby7UOqr9XOCu0zqMvBB2hJ3/07ISd1rDN2IvdC+uh3KoI8Ba4qTNQFZHhKcX/yg/7lGonmov5oR230ppC+2GlFUNy0ntrktxKLXiVinC3qyK8/D+bOLlAihe3rsQUl4U7qN7X0DpHVw+mdSkrrfSZ0V8ZXoB7tnt7bQ4nBl/gKg/t6CvXZgqnWL6JJPsaWkcorU5z0Ax3RdhJHzlAuRVh4ENQckidhxQn+Rpah5nWilCjuzzE6cveOXd5KEwA51ylIfOpsXuN0xSY6ioLOTUBPU+MXLslxH5+S5BJDHIvvRr0S9rPxMgtCwFfglLbn5k+eN2bIZQkd2lIk7fpMU9NF7re035oXz7uHeWWBoMvuFkS6Di4IqCZ7nFZ172zz3J+Lktgubs0yO2L9Wlemh/XEbz3pv3RPn3lgMNNgLc5t2nqmcVJ8o2UElZ6+kpDMvosgWeo1tfgOh195mDBu5aF0/x/Tvv1xdqcyxIE3qKnOPDm/u+rX8dNP4HpULLS6jQHlmOi3FQ/UdB6uG6NwF2LgvZL+6b9e3NdDhcGb/DZRs0nmIINuNEEZlrNAZlOs6aDau8Vg+uXBuUIpDiB9t/+C80pL62Hcs1TYTz0GDU39yxTN8lkskWUgqGbprQ4SzQ1LrPGTfVioO+1gDqhFGMfj1M/1Nc410G5r2lgrJzdoPo4O9r/FdyQgfkQxKzOc5rUHVQrMlCw5pzLpGLee1M/1Bf1N441xib3RlHAjR1Pq/biJhbi2Zax0tpnUtdRrdjpK1Ftv/pTTsVIsYz62/6kopH6HZvckgAYDX//mfJkToz/y7gw86/ClIY+U8B5qr1fcJYEXPCQYj31S32Pdl6ur0QNI+F6oepG3WL5LlxsASutdPYdJsUuqr1vMambPKR4AfV/rUB1baTzcTghDMfpn6g+mhkuW4sLxLLOrr1YtdBhUl+g2vsd6sNRrFwikOJY9PAS+RjBXCRXBUJ8na/srlwkb8BJ59MLvay0Yl0TAhKkqXs9//kveSAf5IX8eDge5RargMVff6z4MFUrG3z9nPnkvkC5BM/wF1QrVag/6pPVP3khP39Zp/yjwPEkVwl30v2qosv8mPyu18/vhM6m06g4QLUPCk6jvEUoxegpl3yRtyHH3S335Dr5icQwGe/189s4ivyfchQrvqDaBw3q21Hov0wgxTryRv7ulmtUwFdb5J1Fc/1rbr9+zkxrkfwQ1T7okAeBFE8hf+SRfFIt98GLiveSwmTPKxSKCNZZuVngt9xRJL/qxOJJvoV8kBeWL/JIPskrRTqLldZvClWh9kLZETxTMAkb8kOemCkmr8y0FspX2ItknQ+6vJFAnsgXyyMvrY4C/2POIhlMMjrI29AUMx9WIGsmGR2sh1j/A2NCWGsPjx+NAAAAAElFTkSuQmCC) 0 center no-repeat;
}
.subscribe-pitch > h3 {
  margin: 0 0 5px;
  font-size: 22px;
  font-weight: bold;
  color: green;
  text-transform: uppercase;
}
.subscribe-pitch > p {
  line-height: 20px;
  color: #111;
}
.subscribe-form {
  position: relative;
  margin: 20px -20px -20px;
  padding: 15px;
  background: #fafafa;
  border-top: 1px solid #ccc;
  border-radius: 0 0 6px 6px;
  background-image: -webkit-linear-gradient(top, #fafafa 0%, #eaeaea 50%, #e1e1e1 51%, #f2f2f2 100%);
  background-image: -moz-linear-gradient(top, #fafafa 0%, #eaeaea 50%, #e1e1e1 51%, #f2f2f2 100%);
  background-image: -o-linear-gradient(top, #fafafa 0%, #eaeaea 50%, #e1e1e1 51%, #f2f2f2 100%);
  background-image: linear-gradient(to bottom, #fafafa 0%, #eaeaea 50%, #e1e1e1 51%, #f2f2f2 100%);
  -webkit-box-shadow: inset 0 1px white;
  box-shadow: inset 0 1px white;
}
.subscribe-input {
   font-family: Verdana;
  font-size: 15px;
  color: #444;
  padding: 0 16px;
  width: 67%;
  height: 35px;
  background: #fefefe;
  background-clip: padding-box;
  border: 1px solid;
  border-color: #999 #aaa #aaa;
  border-radius: 20px;
  -webkit-box-shadow: inset 0 1px 1px rgba(0, 0, 0, 0.2), 0 1px #f8f8f8;
  box-shadow: inset 0 1px 1px rgba(0, 0, 0, 0.2), 0 1px #f8f8f8;
}
.subscribe-input:focus {
  outline: 0;
}
.subscribe-submit {
  display: block;
  position: absolute;
  top: 15px;
  right: 15px;
  padding-left: 15px;
  height: 35px;
  width: 60px;
  background: #60e160;
  border: 1px solid;
  border-color: #4c9d50 #4c9d50 #4c9d50 #55af5a;
  border-radius: 20px;
  cursor: pointer;
  font: 0/0 serif;
  text-shadow: none;
  color: transparent;
  background-image: -webkit-linear-gradient(top, #84f087, #4cd94a);
  background-image: -moz-linear-gradient(top, #84f087, #4cd94a);
  background-image: -o-linear-gradient(top, #84f087, #4cd94a);
  background-image: linear-gradient(to bottom, #84f087, #4cd94a);
  -webkit-box-shadow: inset 0 1px rgba(255, 255, 255, 0.4);
  box-shadow: inset 0 1px rgba(255, 255, 255, 0.4);
}
.subscribe-submit:active {
  background: #4cdf4d;
  -webkit-box-shadow: inset 0 0 3px rgba(0, 0, 0, 0.3);
  box-shadow: inset 0 0 3px rgba(0, 0, 0, 0.3);
}
.subscribe-submit:before {
  content: '';
  display: block;
  margin-top: 1px;
  width: 25px;
  height: 19px;
  background: url(data:image/png;base64,iVBORw0KGgoAAAANSUhEUgAAABkAAAATCAMAAABSrFY3AAAA1VBMVEX///+x/7Wz+7MVbhcYbRWL7YoZbhUYbRS0+rSx/7QnnSWu/7KR7pCO7o6R75AYbRS1+rUWbRaw/7AXbRYXbhYXbBcXbhYZaxaF6YUXbRcWbRWS75KV8JSz+7OC6ICW8ZeI64eW8ZcYbRiZ85qb85qw+bCW8Jef9J+x+LGy/LOK7Iqz/LOy97IsxCgjmx8vxSshmB8inSAyxy6z/rMxxi0joCEhmR8osCQ2yjU3yTM6yzYrwCdK00hS1VEfkB4joSElrSQruyYhkh40yDAglR4glB8zyDIjXVruAAAALXRSTlMASDyEk/t7fjNO9EL2+Ph1MIpU8+RmmXLwvcP28znx8PvubO3rKvXnJ8P5tCGHDR5zAAAAsklEQVR4Xm3N5bKDQAyA0QDFa9Td/d7F6u59/0fqNKnCfv8yJ5kAr2wmD9xau+NV4UHixBhzVQ5c2CMjBAqBUwuC5BI0UkGwCWQd79PvbxbBRBbofj2TCCIeQQxBfazZFsIUwY+buGfg5EUAck+IioAVHKRpsbRHOJefALo8QTrMEW6VKrwSRkjUsq4REMWQEJpJ+M6M+wSLNsEnMYq06nQhmNjbMLbtDyCcNhyP//5/4A7jLiAtlbXGKAAAAABJRU5ErkJggg==);
}
.lt-ie9 .subscribe-input {
  line-height: 33px;
}
</style>
<section class="subscribe">
    <div class="subscribe-pitch">
      <h3>Subscribe</h3>
      <p>Subscribe to our newsletter to get the latest from us.<p>
    </p></p></div>
    <form action="http://feedburner.google.com/fb/a/mailverify" method="post" target="popupwindow" onsubmit="window.open('http://feedburner.google.com/fb/a/mailverify?uri=abushalehfeed', 'popupwindow', 'scrollbars=yes,width=550,height=520');return true" class="subscribe-form">
<input type="hidden" value="abushalehfeed" name="uri" />
<input type="hidden" name="loc" value="en_US" />
<input type="text" onblur="if (this.value == &quot;&quot;) {this.value = &quot;Your email address&quot;;}" onfocus="if (this.value == &quot;Your email address&quot;) {this.value = &quot;&quot;}" value="Your email address" name="email" class="subscribe-input" />
<button type="submit" class="subscribe-submit" value="SignUp" title='' />
</button></form>
</section>

Change Red Texts with your feedburner feed name and as always, you can also modify the CSS as your taste. This widget created by me and you can reshare this widget with a link back to us. And Let me know your Feedback :)

Continue Reading »

Auto Multi Author Profile Info widget for Blogger

I like blogger because it is possible to edit and tweak simply to add new widgets and other useful stuffs. You have the freedom to do anything and make whatever changes you like to have.

Now I have a nice and very useful widget for blogger/blogspot users who blog with multi authors. It shows all of your blog authors Avatar and Post count automatically plus it gives a link to google+ profile, with out any touch in coding or anywhere. This widget are really very useful to new bloggers who don't want to play with codes. And it always give you updated informations. This is especially for multi author blogs. It works on single author blogs too, and you could customize it as you need, but I'll leave that for you as an exercise.

Multi Author Info Widget
*No need any DEMO it will work with any Blogger Template, but if it don't work let me know :)*

Install this widget in Blogger

Installation is simple. Add HTML/Javascript gadget into your blog, and paste the following code and save-

<style type="text/css">
.author-line{background-color:#eee;border:2px solid #ddd;border-radius:10px;font-size:11px;padding:10px;margin:2px 0}.author-avatar{border-radius:100px;box-shadow:0 0 15px #fff;vertical-align:middle}
</style>
<script type="text/javascript">
function replaceAuthorVars(e,t,n){if(!t||!t.author)return e;var r=t.author;var i="";if(r.uri&&r.uri.$t!="")i=r.uri.$t;var s=urlNoAvatar;if(r.gd$image&&r.gd$image.src)s=r.gd$image.src;if(s=="http://img2.blogblog.com/img/b16-rounded.gif"&&urlNoAvatar!="")s=urlNoAvatar;var o="s"+sizeAvatar;s=s.replace(/\/s\d\d+-c\//,"/"+o+"-c/");if(cropAvatar)o+="-c";s=s.replace(/\/s\d\d+(-c){0,1}\//,"/"+o+"/");var u=r.name.$t;var a='<img class="author-avatar" height="'+sizeAvatar+'" width="'+sizeAvatar+'" title="'+u+'" src="'+s+'" />';if(i!="")a='<a href="'+i+'">'+a+"</a>";if(maxUserNameLength>3&&u.length>maxUserNameLength)u=u.substr(0,maxUserNameLength-3)+"...";var f=u;if(i!="")f='<a class="profile-name-link" href="'+i+'">'+f+"</a>";e=e.replace("[user]",f);e=e.replace("[image]",a);e=e.replace("[#]",n);e=e.replace("[count]",t.count);if(t.count!=1)e=e.replace("[post]","posts");else e=e.replace("[post]","post");return e}function showAuthors(e){for(var t=0;t<e.feed.entry.length;t++){var n=e.feed.entry[t];var r="";if(n.author[0].uri&&n.author[0].uri.$t!="")r=n.author[0].uri.$t;var i=n.author[0].name.$t;if(blauthors[i])blauthors[i].count++;else{var s=new Object;s.author=n.author[0];s.count=1;blauthors[i]=s}}if(e.feed.entry.length==500){blndxbase+=500;document.write('<script type="text/javascript" src="http://'+window.location.hostname+"/feeds/posts/default?redirect=false&max-results=500&start-index="+blndxbase+'&alt=json-in-script&callback=showAuthors"></'+"script>");return}var o=[];for(var u in blauthors)o.push([u,blauthors[u]]);o.sort(function(e,t){if(t[1].count-e[1].count)return t[1].count-e[1].count;return e[1].author.name.$t.toLowerCase()<t[1].author.name.$t.toLowerCase()?-1:1});document.write("<di"+'v class="blog-author">');for(var t=0;t<o.length;t++){var a=o[t][1];document.write("<di"+'v class="author-line">');document.write(replaceAuthorVars(txtAuthorLine,a,t+1));document.write("</d"+"iv>")}document.write("</d"+"iv>")}var maxUserNameLength=42;var txtAuthorLine="[image] [user] has written [count] [post]";var sizeAvatar=48;var cropAvatar=true;var urlNoAvatar="https://blogger.googleusercontent.com/img/b/R29vZ2xl/AVvXsEh4Yd3_iL5NrWKdjwEt2bizhEWIhADMXqf9AUZFjCAS9pgwFM6hOFEzXibD3rasuxY97ALg8a36A_R8k6nYZgkmyNxdJBiQAawyyPR17SuPb6ohi1aYVXOpnmVWIc4RdVQ2ziuYhFkiy-Y/"+sizeAvatar+"/avatar_blue_m_96.png";var blauthors={};var blndxbase=1;document.write('<script type="text/javascript" src="http://'+window.location.hostname+'/feeds/posts/default?redirect=false&max-results=500&alt=json-in-script&callback=showAuthors"></'+"script>")
</script>

You can configure some things in the script: maximum user name length, author line template, avatar size, and is avatar cropped or streched. As always, you can also modify the CSS to your taste. And Let me know your Feedback :)

This widget script made by MS-potilas of http://yabtb.blogspot.com, I just modified and reshared this script.

Continue Reading »

Pure CSS3 Expanding Vertical Navigation Menu for Blogger

Pure CSS3 Expending Vertical Navigation Menu for Blogger
This time around we’re going to build a super useful expanding vertical navigation menu. It’s a great way to hide a lot of links in a fairly small space and the animations will add a nice touch to your site. Even if you’re a complete beginner, you should be able to pull this off.

DEMO


As you can see ( in demo ), the sections on the bottom are closed by default and slide open when you over over them. However, to add some nice variation we’ll also include a section that stays open all of the time. In the main section that is always open we’ll include a brief welcome message and in the sections that slide open will be sub-sections of navigation links.

Now that we have a good idea of where we’re going, Let’s get started!

The HTML

The first thing we’re going to do is toss in some nice HTML5 codes to wrap the menu in.

<nav>
    <div class="menu-item alpha">
      <h4><a href="http://www.abushaleh.net/">Home</a></h4>
      <p>Lorem ipsum dolor sit...</p>
    </div>
    <div class="menu-item">
      <h4><a href="#">Portfolio</a></h4>
      <ul>
        <li><a href="#">Web</a></li>
        <li><a href="#">Print</a></li>
        <li><a href="#">Other</a></li>
      </ul>
    </div>
    <div class="menu-item">
      <h4><a href="#">About</a></h4>
      <ul>
        <li><a href="#">History</a></li>
        <li><a href="#">Meet The Owners</a></li>
        <li><a href="#">Awards</a></li>
      </ul>
    </div>
    <div class="menu-item">
      <h4><a href="#">Contact</a></h4>
      <ul>
        <li><a href="#">Phone</a></li>
        <li><a href="#">Email</a></li>
        <li><a href="#">Location</a></li>
      </ul>
    </div>
</nav>

Though it’s not styled at all, the live preview perfectly showcases the hierarchy of our navigation menu.

The CSS

We’re already finished with the HTML. Now time to start with css styles.

* {
  margin: 0px;
  padding: 0px;
}
nav {
  font-family: Helvetica, Arial, sans-serif;
  line-height: 1.5;
  margin: 50px auto; /*for display only*/
  width: 200px;
  -webkit-box-shadow: 2px 2px 5px rgba(0,0,0,0.2);
     -moz-box-shadow: 2px 2px 5px rgba(0,0,0,0.2);
          box-shadow: 2px 2px 5px rgba(0,0,0,0.2);
}
.menu-item {
  background: #fff;
  width: 200px;
}
/*Menu Header Styles 1*/
.menu-item h4 {
  color: #fff;
  font-size: 15px;
  font-weight: 500;
  padding: 7px 12px;
  background: #a90329;
}
.menu-item h4 a {
  color: white;
  display: block;
  text-decoration: none;
  width: 200px;
}
/*Menu Header Styles 2*/
.menu-item h4 {
  border-bottom: 1px solid rgba(0,0,0,0.3);
  border-top: 1px solid rgba(255,255,255,0.2);
  color: #fff;
  font-size: 15px;
  font-weight: 500;
  padding: 7px 12px;
  background: #a90329; /* Old browsers */
  background: -moz-linear-gradient(top, #a90329 0%, #8f0222 44%, #6d0019 100%); /* FF3.6+ */
  background: -webkit-gradient(linear, left top, left bottom, color-stop(0%,#a90329), color-stop(44%,#8f0222), color-stop(100%,#6d0019)); /* Chrome,Safari4+ */
  background: -webkit-linear-gradient(top, #a90329 0%,#8f0222 44%,#6d0019 100%); /* Chrome10+,Safari5.1+ */
  background: -o-linear-gradient(top, #a90329 0%,#8f0222 44%,#6d0019 100%); /* Opera 11.10+ */
  background: -ms-linear-gradient(top, #a90329 0%,#8f0222 44%,#6d0019 100%); /* IE10+ */
  background: linear-gradient(top, #a90329 0%,#8f0222 44%,#6d0019 100%); /* W3C */
  filter: progid:DXImageTransform.Microsoft.gradient( startColorstr='#a90329', endColorstr='#6d0019',GradientType=0 ); /* IE6-9 */
}
.menu-item h4:hover {
  background: #cc002c; /* Old browsers */
  background: -moz-linear-gradient(top,  #cc002c 0%, #6d0019 100%); /* FF3.6+ */
  background: -webkit-gradient(linear, left top, left bottom, color-stop(0%,#cc002c), color-stop(100%,#6d0019)); /* Chrome,Safari4+ */
  background: -webkit-linear-gradient(top,  #cc002c 0%,#6d0019 100%); /* Chrome10+,Safari5.1+ */
  background: -o-linear-gradient(top,  #cc002c 0%,#6d0019 100%); /* Opera 11.10+ */
  background: -ms-linear-gradient(top,  #cc002c 0%,#6d0019 100%); /* IE10+ */
  background: linear-gradient(top,  #cc002c 0%,#6d0019 100%); /* W3C */
  filter: progid:DXImageTransform.Microsoft.gradient( startColorstr='#cc002c', endColorstr='#6d0019',GradientType=0 ); /* IE6-9 */
}
.alpha p {
  font-size: 13px;
  padding: 8px 12px;
  color: #aaa;
}
/*ul Styles*/
.menu-item ul {
  background: #fff;
  font-size: 13px;
  line-height: 30px;
  list-style-type: none;
  overflow: hidden;
  padding: 0px;
}
.menu-item ul a {
  margin-left: 20px;
  text-decoration: none;
  color: #aaa;
  display: block;
  width: 200px;
}
/*li Styles*/
.menu-item li {
  border-bottom: 1px solid #eee;
}
.menu-item li:hover {
  background: #eee;
}
/*ul Styles*/
.menu-item ul {
  background: #fff;
  font-size: 13px;
  line-height: 30px;
  height: 0px; /*Collapses the menu*/
  list-style-type: none;
  overflow: hidden;
  padding: 0px;
}
/*ul Styles*/
.menu-item ul {
  background: #fff;
  font-size: 13px;
  line-height: 30px;
  height: 0px;
  list-style-type: none;
  overflow: hidden;
  padding: 0px;
  /*Animation*/
  -webkit-transition: height 1s ease;
     -moz-transition: height 1s ease;
       -o-transition: height 1s ease;
      -ms-transition: height 1s ease;
          transition: height 1s ease;
}
.menu-item:hover ul {
  height: 115px;
}

The menu is Done!

Customizations

One important thing to note here is that we can’t just set the height to auto ( in css section bolded italic red ) because for some reason this disables the animation. If you don’t want the animation, a height of auto is much more flexible and allows you to vary the number of sub-menu items. If you want to do this with the animation, you’ll have to target the height for each individually.

To add more Menu Item Section, just customize and add below codes:

    <div class="menu-item">
      <h4><a href="link-here">menu-title</a></h4>
      <ul>
        <li><a href="link-here">sub-menu-title</a></li>
        <li><a href="link-here">sub-menu-title</a></li>
        <li><a href="link-here">sub-menu-title</a></li>
      </ul>
    </div>

One Step Installation for Blogger/blogspot Blogs

This step for Beginner Bloggers and Blogger/blogspot users. Not every one have compatibility with coding.

To add this Menu to your blogger blog follow below steps:

1. Go to Blogger Dashboard > Layout
2. Add a HTML/Javascript widget and paste the below codes:

<style type="text/css">
* {
  margin: 0px;
  padding: 0px;
}
nav {
  font-family: Helvetica, Arial, sans-serif;
  line-height: 1.5;
  margin: 50px auto; /*for display only*/
  width: 200px;
  -webkit-box-shadow: 2px 2px 5px rgba(0,0,0,0.2);
     -moz-box-shadow: 2px 2px 5px rgba(0,0,0,0.2);
          box-shadow: 2px 2px 5px rgba(0,0,0,0.2);
}
.menu-item {
  background: #fff;
  width: 200px;
}
/*Menu Header Styles 1*/
.menu-item h4 {
  color: #fff;
  font-size: 15px;
  font-weight: 500;
  padding: 7px 12px;
  background: #a90329;
}
.menu-item h4 a {
  color: white;
  display: block;
  text-decoration: none;
  width: 200px;
}
/*Menu Header Styles 2*/
.menu-item h4 {
  border-bottom: 1px solid rgba(0,0,0,0.3);
  border-top: 1px solid rgba(255,255,255,0.2);
  color: #fff;
  font-size: 15px;
  font-weight: 500;
  padding: 7px 12px;
  background: #a90329; /* Old browsers */
  background: -moz-linear-gradient(top, #a90329 0%, #8f0222 44%, #6d0019 100%); /* FF3.6+ */
  background: -webkit-gradient(linear, left top, left bottom, color-stop(0%,#a90329), color-stop(44%,#8f0222), color-stop(100%,#6d0019)); /* Chrome,Safari4+ */
  background: -webkit-linear-gradient(top, #a90329 0%,#8f0222 44%,#6d0019 100%); /* Chrome10+,Safari5.1+ */
  background: -o-linear-gradient(top, #a90329 0%,#8f0222 44%,#6d0019 100%); /* Opera 11.10+ */
  background: -ms-linear-gradient(top, #a90329 0%,#8f0222 44%,#6d0019 100%); /* IE10+ */
  background: linear-gradient(top, #a90329 0%,#8f0222 44%,#6d0019 100%); /* W3C */
  filter: progid:DXImageTransform.Microsoft.gradient( startColorstr='#a90329', endColorstr='#6d0019',GradientType=0 ); /* IE6-9 */
}
.menu-item h4:hover {
  background: #cc002c; /* Old browsers */
  background: -moz-linear-gradient(top,  #cc002c 0%, #6d0019 100%); /* FF3.6+ */
  background: -webkit-gradient(linear, left top, left bottom, color-stop(0%,#cc002c), color-stop(100%,#6d0019)); /* Chrome,Safari4+ */
  background: -webkit-linear-gradient(top,  #cc002c 0%,#6d0019 100%); /* Chrome10+,Safari5.1+ */
  background: -o-linear-gradient(top,  #cc002c 0%,#6d0019 100%); /* Opera 11.10+ */
  background: -ms-linear-gradient(top,  #cc002c 0%,#6d0019 100%); /* IE10+ */
  background: linear-gradient(top,  #cc002c 0%,#6d0019 100%); /* W3C */
  filter: progid:DXImageTransform.Microsoft.gradient( startColorstr='#cc002c', endColorstr='#6d0019',GradientType=0 ); /* IE6-9 */
}
.alpha p {
  font-size: 13px;
  padding: 8px 12px;
  color: #aaa;
}
/*ul Styles*/
.menu-item ul {
  background: #fff;
  font-size: 13px;
  line-height: 30px;
  list-style-type: none;
  overflow: hidden;
  padding: 0px;
}
.menu-item ul a {
  margin-left: 20px;
  text-decoration: none;
  color: #aaa;
  display: block;
  width: 200px;
}
/*li Styles*/
.menu-item li {
  border-bottom: 1px solid #eee;
}
.menu-item li:hover {
  background: #eee;
}
/*ul Styles*/
.menu-item ul {
  background: #fff;
  font-size: 13px;
  line-height: 30px;
  height: 0px; /*Collapses the menu*/
  list-style-type: none;
  overflow: hidden;
  padding: 0px;
}
/*ul Styles*/
.menu-item ul {
  background: #fff;
  font-size: 13px;
  line-height: 30px;
  height: 0px;
  list-style-type: none;
  overflow: hidden;
  padding: 0px;
  /*Animation*/
  -webkit-transition: height 1s ease;
     -moz-transition: height 1s ease;
       -o-transition: height 1s ease;
      -ms-transition: height 1s ease;
          transition: height 1s ease;
}
.menu-item:hover ul {
  height: 115px;
}
</style>
<nav>
    <div class="menu-item alpha">
      <h4><a href="http://www.abushaleh.net/">Home</a></h4>
      <p>Lorem ipsum dolor sit...</p>
    </div>
    <div class="menu-item">
      <h4><a href="#">Portfolio</a></h4>
      <ul>
        <li><a href="#">Web</a></li>
        <li><a href="#">Print</a></li>
        <li><a href="#">Other</a></li>
      </ul>
    </div>
    <div class="menu-item">
      <h4><a href="#">About</a></h4>
      <ul>
        <li><a href="#">History</a></li>
        <li><a href="#">Meet The Owners</a></li>
        <li><a href="#">Awards</a></li>
      </ul>
    </div>
    <div class="menu-item">
      <h4><a href="#">Contact</a></h4>
      <ul>
        <li><a href="#">Phone</a></li>
        <li><a href="#">Email</a></li>
        <li><a href="#">Location</a></li>
      </ul>
    </div>
</nav>

3. Save and Drag it in your sidebar. Done :)

I hope you enjoyed this walkthrough of building an animated vertical navigation menu. If you can spot any Bug or you face any problem please let us know.

Continue Reading »

Random Posts Plugin for Blogger

random-posts
Random Post Widget for Blogger blogs. A simple way to display arbitrary posts from your blog's archives. The Gadget inherits styles from your Blog. This kind of widget can be useful if your blog has hundreds of posts. As you can't practically promote all the older post to your readers so this can become a passsive way to direct them to those old posts.

Features

- Fast loading.
- Simple Javascript Codes
- Easy to customize
- Support all type of Web browsers
- Mobile web browser support

How to install

1. Just copy below codes paste in HTML/Javascript widget and save.
<script charset='utf-8' type="text/javascript">
var randarray=new Array();var l=0;var flag;var numofpost=5;function randomposts(json){var total=parseInt(json.feed.openSearch$totalResults.$t,10);for(i=0;i<numofpost;){flag=0;randarray.length=numofpost;l=Math.floor(Math.random()*total);for(j in randarray){if(l==randarray[j]){flag=1}}if(flag==0&&l!=0){randarray[i++]=l}}document.write('<ul>');for(n in randarray){var p=randarray[n];var entry=json.feed.entry[p-1];for(k=0;k<entry.link.length;k++){if(entry.link[k].rel=='alternate'){var item="<li>"+"<a href="+entry.link[k].href+">"+entry.title.$t+"</a></li>";document.write(item)}}}document.write('</ul>')}</script>
<script charset='utf-8' src="/feeds/posts/summary?alt=json-in-script&start-index=1&max-results=1000&callback=randomposts"type="text/javascript">
</script>
Change Red Colored value to change number of the posts to display in your blog.

Continue Reading »

Breadcrumb Navigation for Blogger

Breadcrumb Navigation for Blogger
Breadcrumbs are navigational elements that are used to display the depth at which a user currently is in a website. Normally they are present near the top preferably just above post heading or the main heading of a page. In Blogger there are no real sub-directories for which you can show a hierarchical path so we will be using Labels as workaround. Breadcrumbs are an alternative navigation. Not only do they act as a visual aid to inform the reader about their position in the blog's hierarchy but also give a more structured feel.

Install Breadcrumb Navigation in Blogger

1. Go to Template > Edit HTML and tick the Expand Widget Preview Option
2. Now search for <div class='blog-posts hfeed'> and add the following code after it
You might find multiple instances of the term to be searched , add the code only under that , where you can see this code <b:includable id='main' var='top'>
<b:if cond='data:blog.homepageUrl != data:blog.url'>
  <b:if cond='data:blog.pageType == &quot;static_page&quot;'>
    <div class='breadcrumbs' itemscope='itemscope' itemtype='http://data-vocabulary.org/Breadcrumb'>
      <a class='first' expr:href='data:blog.homepageUrl' itemprop='url'><span itemprop='title'>Home</span></a>
      <a expr:href='data:blog.url'> <span itemprop='title'><data:blog.pageName/></span> </a>
    </div>
 <b:else/>
  <b:if cond='data:blog.pageType == &quot;item&quot;'>
    <b:loop values='data:posts' var='post'>
       <b:if cond='data:post.labels'>
         <div class='breadcrumbs' itemscope='itemscope' itemtype='http://data-vocabulary.org/Breadcrumb'>
           <a class='first' expr:href='data:blog.homepageUrl' itemprop='url'><span itemprop='title'>Home</span></a>
           <b:loop values='data:post.labels' var='label'>
            <b:if cond='data:label.isLast == &quot;true&quot;'>
             <a expr:href='data:label.url' itemprop='url'><span itemprop='title'><data:label.name/></span></a>
             </b:if>
           </b:loop>
          </div>
         <b:else/>
          <div class='breadcrumbs ' itemscope='itemscope' itemtype='http://data-vocabulary.org/Breadcrumb'>
           <a class='first' expr:href='data:blog.homepageUrl' itemprop='url'><span itemprop='title'>Home</span></a>
           <a href='#'><span> Unlabelled</span></a>
         </div>
       </b:if>
     </b:loop>
   <b:else/>
    <b:if cond='data:blog.pageType == &quot;archive&quot;'>
      <div class='breadcrumbs ' itemscope='itemscope' itemtype='http://data-vocabulary.org/Breadcrumb'>
       <a class='first' expr:href='data:blog.homepageUrl' itemprop='url'><span itemprop='title'>Home</span></a>
       <a expr:href='data:blog.url'><span>Archives for <data:blog.pageName/></span></a>
      </div>
   <b:else/>
    <b:if cond='data:blog.pageType == &quot;index&quot;'>
      <b:if cond='data:blog.pageName == &quot;&quot;'>
      <b:else/>
       <div class='breadcrumbs' itemscope='itemscope' itemtype='http://data-vocabulary.org/Breadcrumb'>
        <a class='first' expr:href='data:blog.homepageUrl' itemprop='url'><span itemprop='title'>Home</span></a>
        <a expr:href='data:blog.url'><span itemprop='title'>Posts filed under <data:blog.pageName/></span></a>
       </div>
     </b:if>
    </b:if>
   </b:if>
  </b:if>
 </b:if>
</b:if>
3. Save the template

Styles for Breadcrumb Navigation

Style 1 -
Breadcrumb Style 1
.breadcrumbs{list-style:none;margin:0}
.breadcrumbs a{text-decoration:none;color:#444;position:relative;z-index:1;float:left;text-shadow:0 1px 0 rgba(255,255,255,.5);-moz-border-radius:0 100px 100px 0;-webkit-border-radius:0 100px 100px 0;border-radius:0 100px 100px 0;margin:0 -16px 0 0;padding:10px 22px 10px 30px}
.breadcrumbs a:nth-child(odd){border:1px solid #BFC0B0;box-shadow:4px 0 6px 0 #999A8A;background-image:linear-gradient(tobottomright,#BFC0B00%,#CECFC1100%)}
.breadcrumbs a:nth-child(even){color:#FFF;border:1px solid #999A8A;box-shadow:4px 0 6px 0 #BFC0B0;background-image:linear-gradient(tobottomright,#999A8A0%,#A5A895100%)}
.breadcrumbs a:nth-child(even):hover{color:#333}
.breadcrumbs a:nth-child(odd):hover{color:#FFF}
.first,.first:hover{z-index:30!important}
.breadcrumbs a:nth-child(2){z-index:29!important}
.breadcrumbs a:last-child{box-shadow:4px 0 6px 0 transparent!important}
Style 2 -
Breadcrumb Style 2
.breadcrumbs{zoom:1;line-height:40px;height:40px;background-color:#FFF;background-image:linear-gradient(tobottom,#FFF,#EEE);-moz-border-radius:5px;-webkit-border-radius:5px;-ms-border-radius:5px;-o-border-radius:5px;border-radius:5px;border:1px #CCC solid;-webkit-box-shadow:inset 0 -1px 1px rgba(0,0,0,0.3), 0 1px 5px rgba(0,0,0,0.1);-moz-box-shadow:inset 0 -1px 1px rgba(0,0,0,0.3), 0 1px 5px rgba(0,0,0,0.1);-ms-box-shadow:inset 0 -1px 1px rgba(0,0,0,0.3), 0 1px 5px rgba(0,0,0,0.1);-o-box-shadow:inset 0 -1px 1px rgba(0,0,0,0.3), 0 1px 5px rgba(0,0,0,0.1);box-shadow:inset 0 -1px 1px rgba(0,0,0,0.3), 0 1px 5px rgba(0,0,0,0.1);letter-spacing:2px;margin:0;padding:0}
.breadcrumbs:before,.breadcrumbs:after{display:table;content:"";zoom:1}
.breadcrumbs:after{clear:both}
.breadcrumbs a{color:#999}
.breadcrumbs > a{position:relative;height:40px;overflow:hidden;float:left;padding:0 40px 0 20px}
.breadcrumbs > a:after{content:'';position:absolute;right:8px;top:-1px;height:40px;width:40px;border-right:3px rgba(0,0,0,0.1) solid;border-bottom:3px rgba(0,0,0,0.1) solid;-webkit-transform:rotate(-45deg);-moz-transform:rotate(-45deg);-ms-transform:rotate(-45deg);-o-transform:rotate(-45deg);transform:rotate(-45deg)}
.breadcrumbs > a:before{content:'';position:absolute;right:11px;top:0;height:40px;width:40px;border-right:1px rgba(0,0,0,0.2) solid;border-bottom:1px rgba(0,0,0,0.2) solid;-webkit-transform:rotate(-45deg);-moz-transform:rotate(-45deg);-ms-transform:rotate(-45deg);-o-transform:rotate(-45deg);transform:rotate(-45deg)}
.breadcrumbs a :last-child{color:#333}
.breadcrumbs > a:last-child span:before,.breadcrumbs > a:last-child span:after{display:none}
.breadcrumbs a:hover{text-decoration:none!important}
.breadcrumbs span:hover{color:#666}
.breadcrumbs > a:hover:after{border-color:rgba(0,0,0,0.2)}
.breadcrumbs > a:hover:before{border-color:rgba(0,0,0,0.3)}
.breadcrumbs span{margin-top:1px;color:#999}
Style 3 -
Breadcrumb Style 3
.breadcrumbs{list-style:none;height:36px;line-height:36px;padding-left:36px;margin:0}
.breadcrumbs > a{position:relative;float:left;margin-left:-36px;-moz-border-radius:18px;-webkit-border-radius:18px;-ms-border-radius:18px;-o-border-radius:18px;border-radius:18px;background-color:#FFF;background-image:linear-gradient(tobottom,#FFF,#EEE);-webkit-box-shadow:0 0 5px rgba(0,0,0,0.5);-moz-box-shadow:0 0 5px rgba(0,0,0,0.5);-ms-box-shadow:0 0 5px rgba(0,0,0,0.5);-o-box-shadow:0 0 5px rgba(0,0,0,0.5);box-shadow:0 0 5px rgba(0,0,0,0.5)}
.breadcrumbs> a:before{content:'';position:absolute;z-index:-1;left:-6px;top:-6px;width:100%;height:100%;background:#D5D5D5;-moz-border-radius:22px;-webkit-border-radius:22px;-ms-border-radius:22px;-o-border-radius:22px;border-radius:22px;border:1px #C5C5C5 solid;padding:5px}
.breadcrumbs > a > span{color:#666;float:left;padding:0 46px 0 40px}
.breadcrumbs a{list-style:none}
.breadcrumbs a::before,.breadcrumbs a::after,.breadcrumbs a span::before,.breadcrumbs a span::after{content:"";position:absolute;top:50%;left:0;display:none}
.breadcrumbs a span::before,.breadcrumbs a span::after{background:transparent;margin:-8px 0 0}
.breadcrumbs > a:last-child > span{color:#333;padding:0 46px 0 60px}
.breadcrumbs > a:hover,.breadcrumbs > a:last-child{background-color:#EEE;background-image:linear-gradient(tobottom,#EEE,#DDD)}
.breadcrumbs > a:hover > span{color:#FFF;padding:0 66px 0 60px}
.breadcrumbs > a:last-child:hover > span{padding:0 46px 0 60px}
.first,.first:hover{z-index:30!important}
.breadcrumbs a:nth-child(2){z-index:31!important}
.breadcrumbs a:nth-child(3){z-index:32!important}
Add the Above CSS Codes just before ]]></b:skin> and Save the template.

All of above codes from Prayag Verma. We just reshared abobe codes.

Continue Reading »

Pure CSS3 Multi Drop Down Menu for Blogger

Pure CSS3 multi level drop down menu
Today I am sharing another great example of Pure CSS3, in today's tutorial I am sharing a multi level drop down menu which works with pure CSS3 and any single image or javascript is not included in this menu.As is works with pure CSS3,it does not affect the loading speed of your blog as compared to jQuery menus and other menus which works using script and image. This menu is designed by Rethnaraj Rambabu of BloggerMint.com I have fixed some CSS tweaks to work fine with blogger.

Add this Menu to Blogger

To add this Menu to your blogger blog follow below steps:
1. Go to Blogger Dashboard > Layout
2. Add a HTML/Javascript widget and paste the below codes -
<style type="text/css">
#nav {
 float: left;
 font: bold 12px Arial, Helvetica, Sans-serif;
 border: 1px solid #121314;
 border-top: 1px solid #2b2e30;
 overflow: hidden;
 width: 100%;
 background: #3C4042;
 background: -webkit-gradient( linear, left bottom, left top, color-stop(0.09, rgb(59,63,65)), color-stop(0.55, rgb(72,76,77)), color-stop(0.78, rgb(75,77,77)) );
 background: -moz-linear-gradient( center bottom, rgb(59,63,65) 9%, rgb(72,76,77) 55%, rgb(75,77,77) 78% );
 background: -o-linear-gradient( center bottom, rgb(59,63,65) 9%, rgb(72,76,77) 55%, rgb(75,77,77) 78% );
 box-shadow: 0 1px 0 rgba(255, 255, 255, 0.1) inset, 0 0 5px rgba(0, 0, 0, 0.1) inset;
}

#nav ul {
 margin: 0;
 padding: 0;
 list-style: none;
}

#nav ul li {
 float: left;
}

#nav ul li a {
 float: left;
 color: #d4d4d4;
 padding: 10px 20px;
 text-decoration: none;
 background: #3C4042;
 background: -webkit-gradient( linear, left bottom, left top, color-stop(0.09, rgb(59,63,65)), color-stop(0.55, rgb(72,76,77)), color-stop(0.78, rgb(75,77,77)) );
 background: -moz-linear-gradient( center bottom, rgb(59,63,65) 9%, rgb(72,76,77) 55%, rgb(75,77,77) 78% );
 background: -o-linear-gradient( center bottom, rgb(59,63,65) 9%, rgb(72,76,77) 55%, rgb(75,77,77) 78% );
 box-shadow: 0 1px 0 rgba(255, 255, 255, 0.1) inset, 0 0 5px rgba(0, 0, 0, 0.1) inset;
 border-left: 1px solid rgba(255, 255, 255, 0.05);
 border-right: 1px solid rgba(0,0,0,0.2);
 text-shadow: 0 -1px 1px rgba(0, 0, 0, 0.6);
}
#nav ul li a:hover,
#nav ul li:hover > a {
 color: #252525;
 background: #3C4042;
 background: -webkit-gradient( linear, left bottom, left top, color-stop(0.09, rgb(77,79,79)), color-stop(0.55, rgb(67,70,71)), color-stop(0.78, rgb(69,70,71)) );
 background: -moz-linear-gradient( center bottom, rgb(77,79,79) 9%, rgb(67,70,71) 55%, rgb(69,70,71) 78% );
 background: -o-linear-gradient( center bottom, rgb(77,79,79) 9%, rgb(67,70,71) 55%, rgb(69,70,71) 78% );
 text-shadow: 0 1px 0 rgba(255, 255, 255, 0.2), 0 -1px #000;
}

#nav li ul a:hover,
#nav ul li li:hover > a {
 color: #2c2c2c;
 background: #5C9ACD;
 background: -webkit-gradient( linear, left bottom, left top, color-stop(0.17, rgb(61,111,177)), color-stop(0.51, rgb(80,136,199)), color-stop(1, rgb(92,154,205)) );
 background: -moz-linear-gradient( center bottom, rgb(61,111,177) 17%, rgb(80,136,199) 51%, rgb(92,154,205) 100% );
 background: -o-linear-gradient( center bottom, rgb(61,111,177) 17%, rgb(80,136,199) 51%, rgb(92,154,205) 100% );
 border-bottom: 1px solid rgba(0,0,0,0.6);
 border-top: 1px solid #7BAED9;
 text-shadow: 0 1px rgba(255, 255, 255, 0.3);
}
#nav li ul {
 background: #3C4042;
 background-image: -webkit-gradient( linear, left bottom, left top, color-stop(0.09, rgb(77,79,79)), color-stop(0.55, rgb(67,70,71)), color-stop(0.78, rgb(69,70,71)) );
 background-image: -moz-linear-gradient( center bottom, rgb(77,79,79) 9%, rgb(67,70,71) 55%, rgb(69,70,71) 78% );
 background-image: -o-linear-gradient( center bottom, rgb(77,79,79) 9%, rgb(67,70,71) 55%, rgb(69,70,71) 78% );
 left: -999em;
 margin: 35px 0 0;
 position: absolute;
 width: 160px;
 z-index: 9999;
 box-shadow: 0 0 15px rgba(0, 0, 0, 0.4) inset;
 -moz-box-shadow: 0 0 15px rgba(0, 0, 0, 0.4) inset;
 -webkit-box-shadow: 0 0 15px rgba(0, 0, 0, 0.4) inset;
 border: 1px solid rgba(0, 0, 0, 0.5);
}

#nav li:hover ul {
 left: auto;
}

#nav li ul a {
 background: none;
 border: 0 none;
 margin-right: 0;
 width: 120px;
 box-shadow: none;
 -moz-box-shadow: none;
 -webkit-box-shadow: none;
 border-bottom: 1px solid transparent;
 border-top: 1px solid transparent;
}

.nav ul li ul {
    position: absolute;
    left: 0;
    display: none;
    visibility: hidden;
}

.nav ul li ul li {
    display: list-item;
    float: none;
}

.nav ul li ul li ul {
    top: 0;
}

.nav ul li ul li a {
    font: normal 13px Verdana;
    width: 160px;
    padding: 5px;
    margin: 0;
    border-top-width: 0;
    border-bottom: 1px solid gray;
}

#nav li li ul {
 margin: -1px 0 0 160px;
 visibility: hidden;
}

#nav li li:hover ul {
 visibility: visible;
}
</style>
<div id="nav">
 <ul>
  <li><a href="#">Home</a></li>
  <li><a href="#">About Us</a></li>
  <li><a href="#">Our Portfolio</a></li>
  <li><a href="#">One Dropdown</a></li>
  <li><a href="#">Three Levels</a>
  <ul>
   <li><a href="#">Level 2.1</a></li>
   <li><a href="#">Level 2.2</a></li>
   <li><a href="#">Level 2.3</a></li>
   <li><a href="#">Level 2.4</a></li>
   <li><a href="#">Level 2.5</a></li>
  </ul>
  </li>
  <li><a href="#">Services</a></li>
  <li><a href="#">Contact Us</a></li>
 </ul>
</div>
3. Change the links and texts as your need, Save and Drag the widget right below the header.

Continue Reading »

Make a Dropdown labels widget in Blogger


A labels widget displays your post labels. Each label is linked to a page containing posts which fall under that label. Usually as your posts increases, so will your labels. If you don’t limit them, sooner or later your labels widget will take over your sidebar.

Regain control of your sidebar, shrink the widget -by converting it into a dropdown (or is it a pulldown?) menu. Your labels widget size will be reduced to just one line! And only expand into a full list when you click it.

Before applying this Trick, you must already have a Label widget installed.
If you don’t have one, go to Design > Page Elements and add it.

Now let’s make the dropdown :


1. Go to Dashboard > Design > Edit HTML.
2. Back up your template.
3. Make sure you DO NOT tick the Expand Widget Templates checkbox.
4. Look for the following lines in your HTML code:

<b:widget id='Label1' locked='false' title='Labels' type='Label'/>

Replace that line with this code:

<b:widget id='Label1' locked='false' title='Labels' type='Label'>
<b:includable id='main'>
<b:if cond='data:title'>
<h2><data:title/></h2>
</b:if>
<div class='widget-content'>
<select style='width:100%' onchange='location=this.options[this.selectedIndex].value;'>
<option>Click to choose a label</option>
<b:loop values='data:labels' var='label'>
<option expr:value='data:label.url'><data:label.name/>
(<data:label.count/>)
</option>
</b:loop>
</select>
<b:include name='quickedit'/>
</div>
</b:includable>
</b:widget>

Change the width of the dropdown menu bay changing 100% to any percentage, or pixel (px).
You can change “Click to choose a label” phrase in line 8 to your preferred phrase.
Code line 11 is for post count, if you do not want to show post count at the end of each label, delete this line.

Preview before saving.

Congratulations you have shrunk your labels widget and created more space. You can now add more widgets :)

Continue Reading »